Google finally released Google+ Pages that are designed for businesses, brands, causes, and other human and non-human things. The profiles on Google+ are strictly reserved to be personal (or professional).
The feature is in direct competition with Facebook Pages that we are so accustomed too. However, Google's version of pages is very basic. It will be improved over time, but let's get you started with what Google offers right now.
STEP 1: What Type?
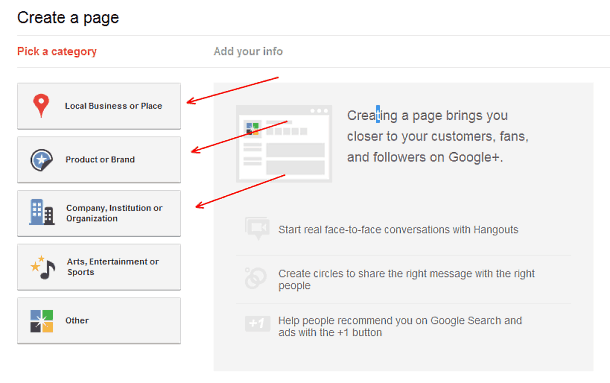
Consider what you're trying to promote: your business, event, or maybe some sort of institution.
- Local Business or Place. This page is ideal for your local event planning business, it is already integrated with Google Places and will ask you to locate your business.
- Product or Brand. This type of page is ideal for your event, conference, convention, fundraiser, etc.
- Company, Institution, or Organization. This is for the big organizations, which is also ideal for non-profits and associations to create a presence on Google+ to connect with members, donors, and volunteers.
- The last two are self-explanatory, and unless you're doing something else, you shouldn't worry about them.
NOTE: Don't get caught up in this step. You can create multiple pages, so once you setup your business page, you can go ahead and create another page for your event (or pages for events).
Start with creating your Google+ Page here.
STEP 2: Enter All Necessary Information
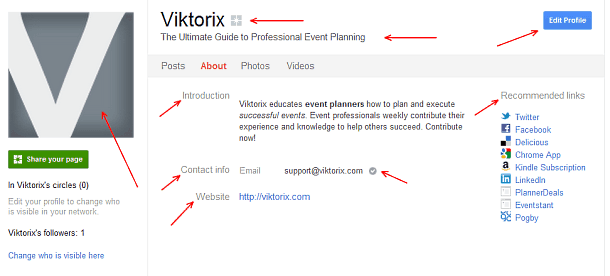
If there's an empty field asking for some sort of information, fill it out! This is your chance to have control over your Google+ reputation, so make sure you fill out all necessary information.
Here's a tip that will put you ahead of the game in terms of search results in Google and other search engines. It's about your description, how it appears in search results is key. But Google doesn't really think that, at least now, so it messes it up.
There are three parts, at this time, that you need to worry about to make sure your meta description is formatted for maximum attention.
149 characters for the meta description is what most search engines will show in search results. It varies, but keeping it with the Google limit will do you good.
But if you do want to provide more information about your event or business, you will have have to sacrifice search results. Google+ uses 250 characters in the description, way too long for search results.
Here's how I formatted meta description of Google+ Page for Viktorix, this is a preview in Bing (Google displays profiles differently from regular search results).

This is Google's combination of the title, tagline, and part of the introduction.
It's annoying, but it will ensure you look good in search results and get those clients to connect with you.
STEP 3: Verify Contact Email
It's a quick step, but I didn't even know I had to do it until I visited the page and saw the “Verify” link.
When you add a contact information (email in this case), Google+ will ask you to verify that email and will display a message saying that it was verified.
Last bit of information for the profile information. Make sure to add your URL to the page, it doesn't only serve as a gateway for your visitors to visit your website but Google uses it to determine relevancy between your page and the website. I'll touch on this more in another step.
STEP 4: Add Recommended Links
Google+ gives you an opportunity to add other related links to your page, use it to promote other websites that you might be a part of.
TIP: Use this section to add social media links: Twitter, LinkedIn, Facebook, and blog link.
Currently, it seems that links in this section do not have rel=”nofollow” attribute, which means that it might be a good backlink to have for your other websites. This is my guess, based on the source code.
This is a great opportunity to add links to event websites to your business page, and vice versa.
STEP 5: Website Badge
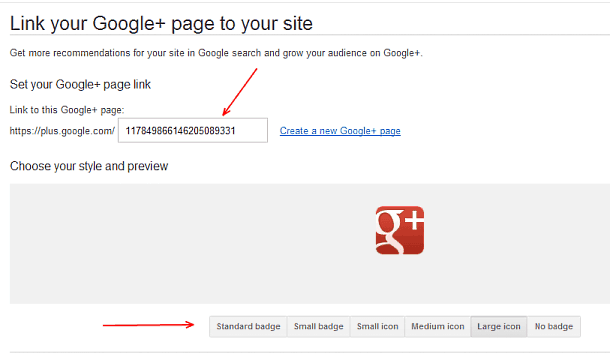
There are three things you can do to link to your Google+ Page from your site. It is important you do it as it helps Google determine relevancy. It works both ways, Google checks for cross-promotion, so to speak, to determine relevancy and use it for another feature that I will discuss in the next step.
- +1 button. You can get a +1 button to add to your website for people to +1 your Google+ Page. Get it here.
- Badge. Right now Google+ offers a very basic icon badge that you can generate. However, they do have a section (though it's not working yet) for an upcoming badge that is very similar to Facebook Like box. Get a badge here.
- Meta Tag. Add a meta tag to your <head> section to help Google see it. Do this even if you're using one of the methods above, this meta tag lets Google know who the publisher of the website is. Get meta tag here.
STEP 6: Google+ Direct Connect
This is not a step, but rather a feature that you just finished optimizing your Page for. It's still in experimental stages, but once it rolls out to more Pages across the Google+ network your Page will be already setup.
Google+ Direct Connect gives easy and quick access to Google+ Pages from Google Search. When someone starts a search query with +, it tells Google they are looking for a Page on Google+, followed by your name.
Google recommends to link your Page with your website by (a) providing a link to your website on your Page, and (b) including a link back to your Page from your website. It helps Google determine relevancy and popularity, increasing your chances of being eligible for Google+ Direct Connect.
STEP 7: Invite Friends
We finished setting up your new page. It looks great, and is optimized for search results (unlike many other pages 😉 )
It's time to invite friends that you already have on your personal Google+ profile, email your list, invite Facebook friends and fans, as well as toot your horn on Twitter. Don't forget LinkedIn, let your professional network know you have a new page for your business or event.
BONUS STEP: Images
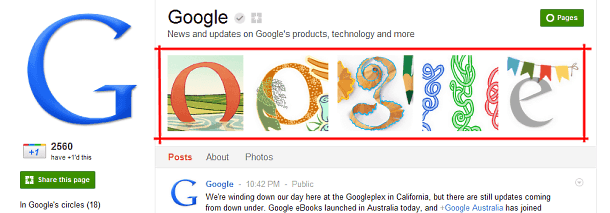
We haven't figured out what images we want to include on the Page, but just like Facebook, you can be creative about it. You can manage this on the same Edit page as the rest of the About section. Be playful.
Tips for the Road
Here's a list of few tips and facts I think you'll find very useful in Google+.
- Only one person can manage Google+ Page for now, they are working on letting you add more admins
- You can create hangouts (video chats) with your followers
- To switch between your page and profile, click on the dropdown menu located on the left sidebar next to your image avatar
- You can only add people to your circles after they add your page to their circle
- Click on “Get started” link, located below your image avatar in the left sidebar, to get access to some important links and features
Was this guide helpful? If you encounter any issues, leave a comment and I will be more than happy to help you as much as possible. If you have any additional tips for your peers, commenting is the best way to share them.
Do share your Google+ Pages with us in the commenting section, we would love to see them.


![How Important Are Face to Face Meetings [INFOGRAPHIC]](https://eventstant.com/wp-content/uploads/faceToface_v11-sm-218x150.jpg)




[…] – 7 easy steps to a Google+ Page for event planners and 3 reasons to circle Event Manager Blog on Google […]
Thanks for sharing such informative and useful content with us keep sharing on such type of articles daily